
A kitchen remodel can look perfect on paper and still fail in daily use. Lights in the wrong places. Too few outlets for actually cooking. Circuits that trip once everything is plugged in.
Most of these problems do not come from bad products. They come from late or poor electrical and lighting planning in a kitchen remodel. And that’s what we will fix in this article.
If you are planning a kitchen remodel or already finalising layouts, this will walk you through how to prepare electrical and lighting changes in the correct order, with real use in mind, not just code requirements.
The goal is simple. Make decisions once. Make them correctly.
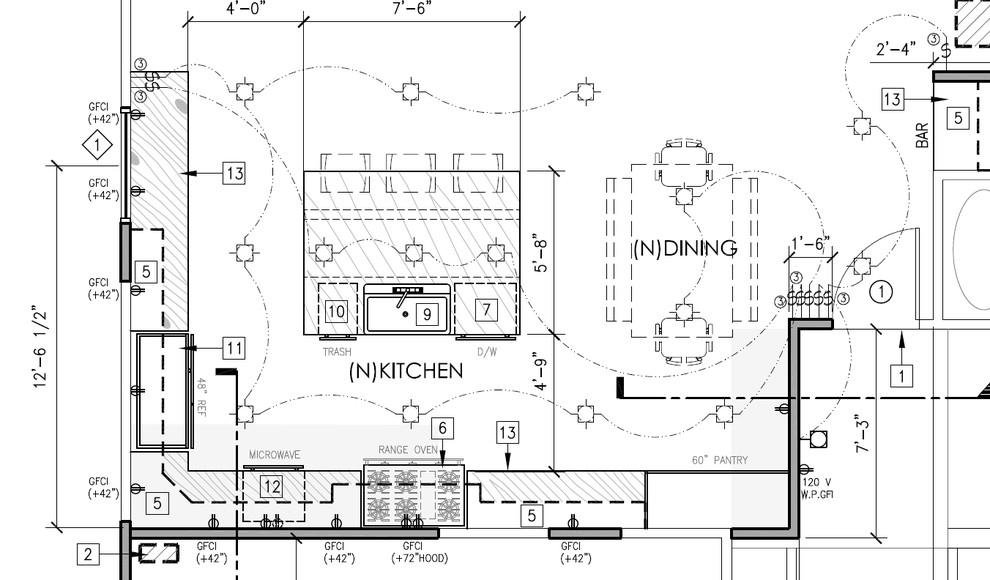
Table of Contents
Quick Answer
Before cabinet layouts and finishes are finalised, electrical and lighting modifications are to be planned. Begin with your real kitchen usage, calculate appliance loads early, locate outlets where work occurs, and plan lighting in layers, ensuring you do not overload fixtures.
Kitchen Electrical and Lighting Planning Table
Kitchen area | What to plan | Why it matters | Common mistake |
Cooking zone | Dedicated circuit and nearby outlets | Prevents overload and unsafe workarounds | Sharing circuits with small appliances |
Refrigerator | Dedicated outlet with access | Avoids tripping and food loss | Plugging into general-use outlets |
Kitchen island | Side or pop-up outlets | Supports real prep and appliance use | No outlets or blocked access |
Prep countertops | Frequent, reachable outlets | Reduces cord stretching | Relying only on minimum code spacing |
Under-cabinet lighting | Task-focused lighting | Improves visibility and safety | Using ceiling lights only |
Accent and pendant lights | Separate switches or dimmers | Controls brightness and comfort | All lights on one switch |
Start With How You Use the Kitchen?
Before circuits, switches, or lighting types, there is one step most remodels skip. Understanding how the kitchen is actually used. Not how it looks in renderings. How it works on a typical day.
Daily Workflows That Shape Electrical Decisions
Some kitchens are used lightly. Others run all day. Preparing dishes, various machines operating simultaneously, and a person or people moving.
Ask practical questions:
- Where do you prepare most often?
- Which appliances stay plugged in daily?
- Do you cook alone or with others?
- Is the island a work surface or mostly seating?
Baking occurs every day in a kitchen; a different outlet should be used than the one primarily used to reheat meals. The importance of lighting in key prep areas is more important than the lighting over walkways. These details propel all other subsequent electrical choices.
Don’t Copy Old Kitchen Layout
Older kitchens had fewer appliances and lighter loads. One microwave. No air fryer. No espresso machine drawing power all morning.
When remodels reuse outlet locations or circuit plans from the existing kitchen, the result is usually frustration. Extension cords. Tripped breakers. Poor task lighting.
The layout might look familiar, but usage has changed. Electrical planning needs to change with it.
Finalise These Decisions Before Wiring
Certain decisions cannot stay flexible if you want clean electrical work:
- Appliance locations.
- Island size and orientation.
- Appliance garages or storage zones.
- Future upgrade plans include adding double ovens or installing induction cooktops.
In many remodels we review, these decisions are confirmed too late, forcing electricians to work around finished layouts. Early clarity here consistently results in cleaner wiring, fewer compromises, and better long-term usability.
Plan Electrical Load and Circuits Before Walls Are Closed
Remodelling plans often look perfect on paper, yet electrical load planning gets overlooked in the process. Because it’s hidden behind walls, it rarely feels urgent.
The problem surfaces later — breakers start tripping, power cuts out at the worst moments, and running multiple appliances turns into a daily inconvenience. Proper load calculations prevent those avoidable disruptions.
Heavy Appliances That Need Separate Circuits
These include:
- Electric cook stove or induction cooker
- Refrigerators
- Dishwashers
- Microwaves
- Garbage disposals
On the one hand, it is possible to share circuits in some combinations based on local code and usage, but this is a widespread assumption at the outset and may be revisited later. It is better to enumerate all appliances at the start, even small yet power-hungry ones, so that there are no surprises.
Electrical Load Mistakes Most Remodels Make
After completing hundreds of remodels at George Living, we have observed two recurring mistakes. These rarely appear during inspection and show up only after the kitchen is in full use.
First, planning only for current appliances. Future upgrades get ignored. A standard cooktop today becomes induction later. A single oven becomes double. Wiring is already provided behind the complete walls.
Another common mistake is forgetting how many things run simultaneously. Morning coffee brewing, toast popping, and task lighting under the cabinets can easily overlap.
On paper, it looks fine. In practice, breakers trip.
Why are Late Electrical Changes Expensive?
Walls need to be open to reduce the cost of electrical changes. After installing kitchen cabinets, tile and finishes, even minor changes require cutting, patching and repainting.
That’s why experienced remodelers complete kitchen electrical planning on schedule. It minimises rework and ensures a predictable budget.
By the way, if you are buying new cabinets for this remodel as well, George Living offers plenty of design options. Check out George Living kitchen cabinets catalogue to see whether they have the right design for you.

Kitchen Outlet Planning For Remodel
Code tells you the minimum. It does not specify what makes a kitchen comfortable to use. It is in this area that most kitchens fail, yet they are not very convenient.
Where Outlets are Most Often Missing?
Some of the most common problem areas:
- Kitchen islands without usable outlets.
- Prep zones with appliances but no nearby power.
- Appliance garages were added after the wiring was completed.
People end up stretching cords across counters or using power strips. Neither is ideal in a kitchen.
Hidden Outlets
Hidden outlets are most effective when they’re part of the original layout plan. Under-cabinet plugs, drawer charging setups, and interior cabinet outlets help maintain a clean backsplash and counter space. They are an issue when applied to daily appliances whose cords hang or are difficult to reach.
Code Compliance vs Real Usability
Meeting code is required. Stopping there is the mistake.
Code spacing does not always match how people cook. A counter may meet outlet requirements and still feel inconvenient if outlets are blocked by appliances or placed too far from prep areas.
Good planning goes beyond spacing. It follows movement and habits.
Common Kitchen Outlet Placement Mistakes
A few patterns show up again and again:
- Outlets behind fixed appliances.
- Positioning island outlets where seating blocks have access.
- Outlets are too low or too high for comfortable use.
For more efficient outlet planning, read this guide on outlets in kitchens and bathrooms by the International Code Council.
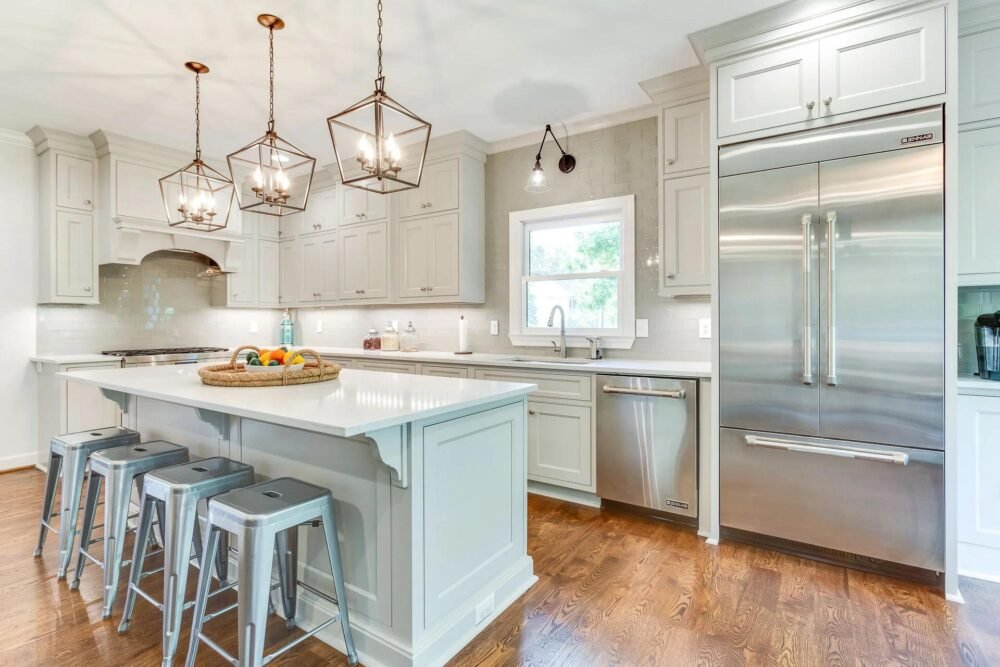
Kitchen Lighting Planning That Works
Now let’s move to the second part of electrical and lighting planning in a kitchen remodel. This is where most of the remodels look good and still feel wrong. The space is bright, yet counters sit in shadow. Or everything is lit so evenly that the room feels flat and uncomfortable at night.
Good kitchen lighting supports work first. Style comes second.
Why do More Lights Not Mean Better Lighting?
The most common response to a dark kitchen is to add more recessed lights. It is also among the most widespread errors.
An excessive number of ceiling lights creates glare on countertops and shadows from your body, blocking the light. Prep work suffers. Eyes get tired. The kitchen feels harsh instead of comfortable.
Each light should have a reason to exist. If it does not support a task or movement, it does not belong there.
Layered Kitchen Lighting Explained Simply
A functional kitchen uses layers. Not design jargon. Real purpose.
Lighting layer | Purpose | Where it works best |
Ambient | Overall visibility | Ceiling fixtures, recessed lights |
Task | Focused work lighting | Under cabinets, sink, prep zones |
Accent | Visual comfort | Pendants, in-cabinet lighting |
Most kitchens already have ambient lighting. What they lack is proper task lighting in the places that matter most.
Under-Cabinet and Accent Lighting Decisions
Under-cabinet lighting is one of the highest value upgrades in a kitchen remodel. It lights the work surface directly and reduces the need for brighter ceiling lights.
It is beneficial in kitchens with deeper cavities or a darker finish. The countertop is covered in smooth, consistent light that reduces shadows and makes food prep more comfortable and secure.
Accent lighting, like small lamps or cabinet interior lights, should operate independently. That way, you can switch from full work lighting to a relaxed evening glow without lighting up the entire space.
Where to buy these lights? The George lighting has everything you need, including chandeliers, ceiling lights, LED lighting, under-cabinet lighting, and more.
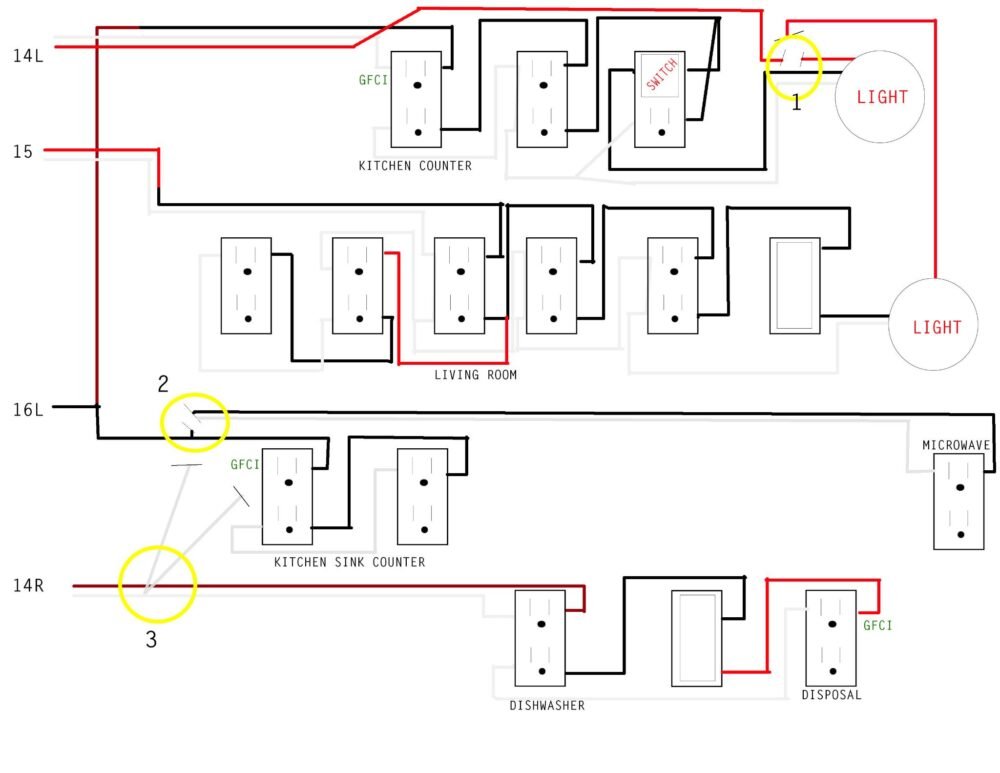
Switches, Dimmers, and Control Planning
Lighting control is as essential as the location of the light fixtures.
Having too many lights on a single switch eliminates flexibility. Dimmers are more critical than one might imagine. They enable the same kitchen to serve early mornings, cooking sessions and silent evenings.
The switch position must be intuitive. When you pass up or go across the room to turn on the lights, then you know there is something wrong with the plan.
What’s the Real Cost of Electrical and Lighting Changes During a Renovation?
Prices vary widely depending on layout modifications, local labour rates, and early decisions.
The few alterations that would occur during the open-wall remodel are much cheaper than those required once the cabinets and finish are installed. Early additions, such as circuits, outlet relocation, or anticipatory wiring, are much more affordable.
The most significant cost driver is not the quantity of fixtures. It is a rework.
Expensive Errors that Decrease Service Life
A few mistakes show up consistently:
- Finalising cabinets before electrical planning.
- Over-lighting instead of placing task lighting correctly.
- Ignoring future appliances or technology upgrades.
These choices do not always show up during inspection. They show up during daily use.
Mistakes to Avoid When Planning Electrical and Lighting Changes in a Kitchen Remodel
Most kitchen electrical problems are not technical failures. They are planning failures. These mistakes usually feel small during design and become daily frustrations after move-in.
- Planning electrical and lighting after cabinets and layouts are already finalised.
- Assuming code compliance automatically means good usability.
- Adding more ceiling lights instead of improving task lighting where work happens.
- Ignoring future appliances and upgrades during load planning
- Placing island and prep-zone outlets where they are blocked or hard to reach
- Putting all kitchen lights on one switch with no dimming or separation
Planning only lighting and electrical changes is not enough for a kitchen remodel? To ensure the entire process goes smoothly, we recommend reading this step-by-step guide kitchen remodel guide. We have developed it after learning from homeowners’ mistakes in hundreds of kitchen remodels.
FAQs
What Lighting is Best For a Kitchen?
The best kitchen lighting is the combination of layered and high-CRI LED lighting. Keep colour temperature between 3500 and 4000 kelvin for under cabinets, and 2700 to 3000 kelvin for ceiling lights.
What are the Principles Of Kitchen Lighting?
The main kitchen lighting principle is to create layering with three main types: ambient, task, and accent. Use above 80 CRI for accurate colour rendering, avoid shadows on workspaces, and place pendants 30 to 36 inches above islands.
What is in Style For Kitchen Lighting?
The 2026 kitchen lighting trends focus on bold, oversized statement pendants, organic materials, and layered functional lighting. Alongside these, asymmetrical clustering and bright LED lights are also being used.
Where to Place the Kitchen Socket?
Kitchen sockets should be placed 15 to 20 cm above countertops. Avoid putting them directly behind sinks or hobs. Ensure a minimum distance of 30 cm from sinks and 10 cm from hobs for safety.
How Many Circuits Do I Need for a Kitchen?
A standard kitchen needs 7 circuits to handle heavy appliance loads, ensure safety, and prevent tripped breakers. However, the exact number can vary depending on the appliances you are going to use in the kitchen.
Conclusion
Electrical and lighting design works well when initiated early, and not necessarily drawing or code manual checklists, but actual kitchen performance.
Lock your layout first. Plan the electrical load for the future. Definitely locate offices where action takes place. Lighting layers are better than additional fixtures.
These decisions are made well before walls are built, making the kitchen easier to operate daily. The issues persist for years, whether they are accelerated or slowed.
The easiest way to avoid regret later is to review electrical and lighting early on, especially if you plan to remodel your kitchen.
Planning ahead ensures your bathroom accessibility solutions continue to work as needs evolve.
These errors are usually avoidable with early checks and real-world testing. Our team at George’s Living emphasises measurement and mock-ups to prevent falls.